Data Ingestion to Elasticsearch and S3 using Kafka and Streamsets Data Collector
Creating a reliable and scalable custom data ingestion pipeline platform can be a tedious process requiring a lot of manual configuration and coding. To address that, the snapblocs Data Flow platform blueprint makes it easy to create a multi-source, multi-destination ingestion pipeline on Kubernetes.
The goal of this tutorial is to show how easy it is to create data ingestion pipelines using the snapblocs Data Flow platform blueprint. Create data ingestion pipelines within an hour without writing code. The demo includes ingesting Avro data from the Internet to AWS S3 and Elasticsearch using Kafka and StreamSets Data Collector provisioned by the snapblocs Data Flow platform blueprint.
The following related tutorial videos are also available:
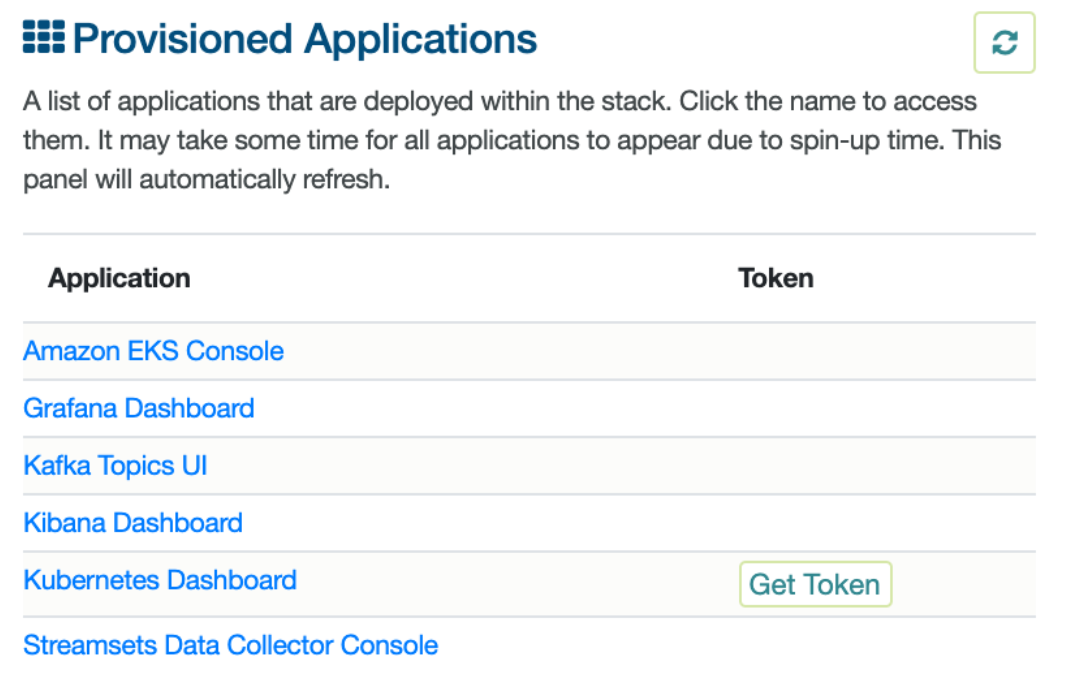
During this tutorial, the following applications will be used on Kubernetes stacks provisioned by the snapblocs Data Flow platform blueprint.
- AWS EKS
- Elasticsearch, Logstash, FileBeat, MetricBeat, Kibana
- Grafana
- Kafka (Kafka brokers, Zookeeper, Kafka Connect, Kafka Connector, Schema Registry, Kafka Dashboard UI)
- Kubernetes Dashboard
- StreamSets Data Collector
Downloading and manually installing these applications is not required. The snapblocs Data Flow platform blueprint will install and configure them on the specified AWS environment. Access them through the links provided by snapblocs once the application stack is deployed.
Note: This tutorial was taken from the StreamSets tutorial, Simple Kafka Enablement using StreamSets Data Collector, and was modified to show the benefits of using snapblocs data platform blueprints.
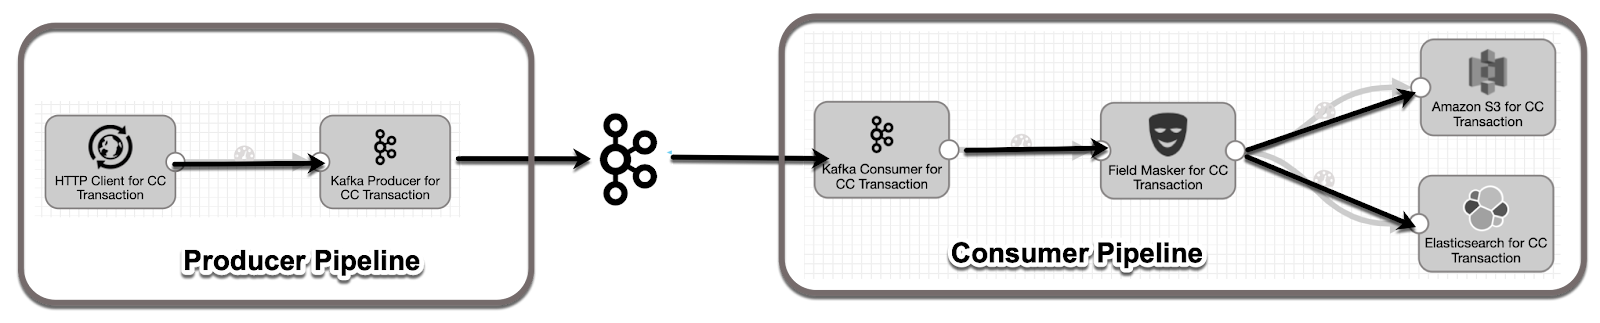
Top-level overview of Data Ingestion flow
Use the first (Producer) pipeline to read Avro data from the Web and write records to a Kafka Topic using the StreamSets Kafka Producer. Then use a second, Consumer pipeline configured with a Kafka Consumer to drain that Topic, perform a transformation and send the data to AWS S3 and Elasticsearch destinations.
Note
- This tutorial is designed to use both StreamSets Data Collector and Kafka together to ingest data for the purpose of this demo only. Use either one of them or both of them for other data ingestion scenarios based on whatever’s required, such as a drag-and-drop design, handling backpressure, etc.
Prerequisites
- Download the preconfigured Producer and Consumer pipeline configuration JSON files provided by snapblocs and located with this video. Step-by-step video
Part 1 - Publishing to a Kafka Producer
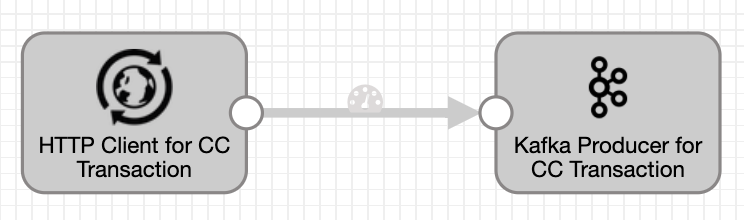
In Part 1, set up a pipeline to send Avro data to the Kafka broker.
Access StreamSets Data Collector
- Access the StreamSets Data Collector console from the Provision Applications panel of the deployed stack by following the instructions found here.
- Use "admin" for both username and password
Import a pipeline
- On the StreamSets Data Collector Home page, click the "IMPORT PIPELINE" button
- Enter a title such as, "Producer Pipeline"
- Select the downloaded "Producer-Pipeline.json" file to import into StreamSets Data Collector
Defining configuration
- On the main StreamSets Pipelines page, select "Producer Pipeline"
- All configurations have been set for this tutorial
- Select the HTTP Client processor on the canvas and browse all preconfigured settings such as:
- HTTP Tab: Resource URL, Max Batch Size, etc.
- Data Format Tab: Data Format, Avro Schema Location, etc.
- Select the Kafka Producer processor on the canvas and browse all preconfigured settings such as:
- Kafka Tab: Broker URI, Topic (test_cc_tranx)
- Data Format Tab: Data Format, Avro Schema Location, Avro Compression Codec, etc.
Part 2 - Reading from a Kafka Consumer
Part 2 will cover setting up a pipeline to drain data from a Kafka Consumer, making a simple transformation, and then writing the output to AWS S3 and Elasticsearch. And observing the built-in transformation stage which masks the credit card numbers in order to only pass the last 4 digits.

Import a pipeline
- On the StreamSets Data Collector Pipeline Home page, click the "+Create New Pipeline" drop-down menu and select "Import Pipeline"
- Enter a title such as, "Consumer Pipeline"
- Select the downloaded "Consumer-Pipeline.json" file to import into the StreamSets Data Collector
Defining the source
- On the main “StreamSets Pipelines” page, select "Consumer Pipeline"
- Most of the configurations have been set for this tutorial. (Provide AWS account information to store ingested data to S3. See the details below)
- Select the Kafka Consumer processor on the canvas and browse all preconfigured settings such as:
- Kafka Tab: Broker URI, Topic (test_cc_tranx), ZooKeeper URI, Max Batch Size
- Data Format: Data Format, Avro Schema Location, etc
- Select the Field Masker processor on the canvas and browse all preconfigured settings such as:
- Mask Tab: Fields to Mask, Custom Mask, etc.
- Data Format: Data Format, Avro Schema Location, etc.
- The Field Masker process masks the credit card number so that the last 4 digits of the card is all that makes it to the data stores
- Select the Amazon S3 processor on the canvas and browse all preconfigured settings such as:
- Amazon S3 Tab: Provide the following:
- Access Key ID (Provide AWS account Access Key ID)
- Secret Access Key (Provide AWS account Secret Access Key)
- Region (The AWS Region where the Data Flow stack was deployed)
- Bucket (The AWS S3 Bucket must exist where ingested data is to be stored)
- Data Format Tab: Data Format, Avro Schema, etc.
- Select the Elasticsearch processor on the canvas and browse all preconfigured settings such as:
- Elasticsearch Tab: Cluster HTTP URIs, Index (Kafka), Mapping (Kafka)
Part 3 - Execute the Pipelines
Execute the Producer pipeline
- Optionally, start the Producer pipeline after starting the Consumer pipeline in order to simultaneously see the data flow from the Producer to the Consumer
- Click the Start icon on the Producer pipeline. The pipeline should start sending data to Kafka.
- Click the Summary tab to see the progress of data sent to Kafka
- Watch the Producer Execution
- Verify the data on the Kafka Topic of the deployed stack
- Select test_cc_tranx Topic on Kafka Topics UI
- It may take a minute to refresh Kafka messages on the Topic
Execute the Consumer pipeline
- Click the Start icon on the Consumer pipeline. The pipeline should start consuming data from Kafka.
- Click the Summary tab of the Kafka Consumer processor on the canvas to see the progress of data read from Kafka
- Select the Amazon S3 processor on the canvas to see the progress of the data being sent to the S3
- Verify the saved data in the S3 bucket objects
- Select the Elasticsearch processor on the canvas to see the progress of data being sent to Elasticsearch
- Verify the Elasticsearch indexed data on Kibana of the deployed stack
- Once all 10,000 records have been processed, stop the Execution
Part 4 - Validate Ingested Data
Validate the Producer execution
- Verify the data on the Kafka Topic of the deployed stack
- Select test_cc_tranx Topic on Kafka Topics UI
- It may take a minute to refresh Kafka messages in the Topic
Validate Consumer execution
- Go to the AWS S3 bucket and see the list of S3 objects created during the data ingestion
- Follow these steps to see the new Elasticsearch Kafka index:
- From Kibana, click the Management menu
- Select "Index Management" on the Elasticsearch application
- Notice the number of records in the Kafka index
- Select "Index Patterns" on the Kibana application
- Click "Create Index Pattern"
- Enter "Kafka*" for the Index pattern
- Click "Next"
- Click "Create Index Pattern"
- Notice the new Kafka index on the Kibana Discover page
- Go to the Kibana Dashboard page
- Enter "[Filebeat Kafka] Overview ECS" to search the Kafka Dashboard
Reference
Avro record format:
- {
- "transaction_date":"dd/mm/YYYY",
- "card_number":"0000-0000-0000-0000",
- "card_expiry_date":"mm/YYYY",
- "card_security_code":"0000",
- "purchase_amount":"$00.00",
- "description":"transaction description of the purchase"
- }
Related Articles
How to Use Provisioned Applications
This video shows how to interact with applications provisioned by a Data Flow stack. Data Flow stack is a managed service using Kubernetes that can be used to move data from various input data sources to target data destinations in-stream or bulk ...How to Deploy Stack
This video shows how to deploy a Data Flow stack. Data Flow stack is a managed service using Kubernetes that can be used to move data from various input data sources to target data destinations in-stream or bulk mode. See here for detail of the Data ...How to Manage Lifecycle of Stack
This video shows how to use snapblocs UI to pause, resume, clone, move the stack created through snapblocs. Watch the video here. Clone and move Once a stack has been configured for one project, an authorized user can easily clone the stack ...